• Chat 24*7
  • +1-(315) 215-3533
  • +61-(02)-8091-3919
  • +91-(120)-4137067
Clixlogix
  • About
    • Company
    • Our Team
    • How We Work
    • Partner With Clixlogix
    • Security & Compliance
    • Mission Vision & Values
    • Culture and Diversity
  • Services
    • All
    • Mobile App
    • Web Development
    • Low Code Development
    • Design
    • SEO
    • Pay per click
    • Social Media
  • Solutions
  • Success Stories
  • Industries
  • We’re Hiring
  • Blog
  • Contact
Get In Touch
Clixlogix
  • About
    • Company
    • Our Team
    • How We Work
    • Partner With Clixlogix
    • Security & Compliance
    • Mission Vision & Values
    • Culture and Diversity
  • Services
    • All
    • Mobile App
    • Web Development
    • Low Code Development
    • Design
    • SEO
    • Pay per click
    • Social Media
  • Solutions
  • Success Stories
  • Industries
  • We’re Hiring
  • Blog
  • Contact
We are available 24/ 7. Call Now.

(888) 456-2790

(121) 255-53333

example@domain.com

Contact information

Theodore Lowe, Ap #867-859 Sit Rd, Azusa New York

Shape Images
678B0D95-E70A-488C-838E-D8B39AC6841D Created with sketchtool.
ADC9F4D5-98B7-40AD-BDDC-B46E1B0BBB14 Created with sketchtool.
  • Home /
  • Blog /
  • Cost Optimization Guide for n8n AI Workflows to Run 30x Cheaper
#Ai/Ml

Cost Optimization Guide for n8n AI Workflows to Run 30x Cheaper

by Akhilesh Thakur
46 min read

If you work long enough with n8n and AI, you eventually get that phone call, the one where a client sounds both confused and slightly panicked. For us, one of those calls came from a founder who had just fired his automation vendor. His exact words:

We built all these AI workflows to save money. Now I’m spending more on tokens than on payroll.

He wasn’t exaggerating.

Their n8n instance was running a beautifully designed, but financially catastrophic, set of AI flows. Every customer email triggered a multi branch chain of GPT 4 calls, the kind of customer interaction workflow where one message can spawn multiple downstream actions. Every support ticket went through three separate summarizers. Even automated system alerts were being sent to a premium LLM “just in case it caught something the humans missed.”

The monthly bill crossed four figures because the system was intelligent yet indiscriminate.

When we inherited that workflow, the logs told the real story, hundreds of thousands of repetitive system prompts, duplicated context, unbatched inputs, and zero routing logic. 

A perfect example of what happens when enthusiasm scales faster than architecture. Over the past few years, across 35+ n8n builds, we’ve seen the same ritual repeat in different flavors…

Late night escalation calls

weekend rebuilds, 

“we don’t know what broke but the invoices look wrong,” and 

AI nodes sprinkled everywhere like glitter.

Some of these systems were inherited from an outgoing provider. Some were built internally during one of those “move fast, the client demo is Monday” sprints.

All of them shared the same root problem:

“AI got expensive due to design choices.”

This guide is much more than just a victory lap, it is intended to serve as a field report for you if you play with n8n workflows.

A collection of playbooks refined at 2 AM after production failures, workflows that ran wild, and token bills that taught us painful but necessary lessons.

And after enough of these battle scars, you start to see the underlying mechanics, the things that consistently drive costs up, and the levers that reliably bring them down. The same levers that let you cut n8n AI workflow costs by 30× without making the system any less intelligent, just far better engineered.

What follows is the distilled version of those learnings – the same frameworks we use now to audit, rebuild, and harden AI powered n8n systems, whether they belong to a startup, an enterprise operations team, or a founder who’s just realized “thinking in tokens” is the new literacy.

Why n8n AI Workflows Become Expensive (Even When They Look Simple)

If you’ve never audited an AI heavy n8n workflow before, the first surprise is how innocent everything looks. On the visual canvas, it all feels deceptively calm, a tidy arrangement of nodes doing tidy things. The execution logs are where that illusion goes to die. Here’s the uncomfortable truth we’ve learned across dozens of rebuilds:

“AI costs grow through accumulation. Every design choice has a price, and the system pays it at scale.”

Most teams don’t realize this because the workflows feel lightweight:

  • “It’s just a summarizer.”
  • “It’s only one classification call.”
  • “It’s only triggered when a new email arrives.”
  • “GPT-4 is only used to ensure quality.”

These are all reasonable decisions in isolation. The problem is that n8n executes at scale. Once you look closely, five hidden forces almost always show up:

1. Repeated System Prompts = 50 to 70% Token Waste

Every time a workflow touches a model, it sends the same long system instructions. Over thousands of runs, this is where most teams burn money without realizing.

2. Branch Explosion (The Evil Multiplier)

One email can trigger:

  • sentiment analysis
  • summarization
  • category detection
  • routing
  • “Just in case” audit checks

Five calls becomes fifteen very quickly.

3. LLMs Handling Work They Shouldn’t Handle

LLMs are used for:

  • regex
  • scoring
  • cleaning
  • deduplication

Tasks they’re objectively bad at. Tasks that should cost $0.00001 but end up costing $0.02.

4. No Batching Means Paying Per Record Instead of Per Job

100 records = 100 calls. Even if each call re sends the same context. Batching turns 100 calls into 1 but most workflows aren’t designed for it.

5. Everything Gets Sent to the Most Expensive Model

“Premium model as default” is the most common smell. GPT 4 or Claude Sonnet is used where a $0.15/M token model is more than enough.

Once you understand these forces, cost blowouts stop being mysterious. They become predictable outcomes of the architecture.

And this is where the guide truly begins, because once you know why things break, you can design workflows that scale intelligently instead of expensively.

Lesson 1 – Choosing the Right Model for the Job

When you study enough n8n systems that rely on AI models, one aspect becomes obvious. Models are assigned early in the build, and the same choice carries forward into every branch of the workflow. Premium models often appear inside steps that range from summarization to routing to lightweight text cleanup. Once these workflows start running at scale, the cost reflects the cumulative effect of that decision.

High volume automations amplify everything. A small decision in one node becomes a large expense across thousands of executions. The premium model performs well, and because it performs well, it stays in place. Over time, the total cost grows in a way that feels disconnected from the simplicity of many tasks inside the workflow.

A more reliable approach is to anchor each step to the minimum level of model capability required for the task. Some steps need depth. Many do not. Assigning model tiers based on the actual cognitive load of each task keeps the workflow predictable, reduces cost growth, and avoids turning routine operations into premium token processes.

To make this easier to apply, we use a straightforward method. Each step is tested with a small set of model tiers. The outputs are measured against a clear baseline for accuracy, consistency, and structure. The model that meets the baseline at the lowest cost becomes the default choice for that step. This gives every workflow a cost foundation that holds up whether the system runs ten times a day or ten thousand.

A Simple Model Scoring Matrix (Use This First)

Run your real workflow inputs through three models:

1. a cheap model

2. a mid tier model

3. a premium model

Score each on the following 5 criteria:

Criteria Weight Cheap Model Mid-Tier Model Premium Model
Accuracy 40% 1–5 1–5 1–5
Consistency 20% 1–5 1–5 1–5
Hallucination Risk 15% 1–5 1–5 1–5
Throughput Speed 10% 1–5 1–5 1–5
Token Cost / 1K 15% $X $Y $Z

Rule:

“If a cheaper model scores ≥85% of the premium model’s total weighted score, choose the cheaper model.”

This instantly collapses most unnecessary spending.

A Practical Task to Model Table (Avoid Guessing)

Use this every time you add an AI node:

Task Type Recommended Model Tier
Routing, classification Tiny/Nano
Summaries under 200 words Start with a tiny model.
If it fails to meet the baseline for this task, move one step up to a mid-tier model.
Rewrite for tone/clarity Tiny/Small
Extraction / JSON structuring Small/Mid
RAG response with facts Mid Tier
Multi-step reasoning, code generation Premium (only if necessary)

The Zero Cost Model As A Strategic Advantage

In the relentless pursuit of cost efficiency, the best model is often the one that costs nothing. Many LLM aggregators offer a rotating selection of high performing models with a daily quota of free requests.

For high volume, low complexity tasks (e.g., simple filtering, initial routing, or status checks), the strategic choice is to route them through a Zero Cost Model. This is a permanent, structural cost killer. By offloading 10 to 20% of your total calls to a free tier, you create a permanent, non linear reduction in your total token spend, reserving your budget for the actual “heavy lifting” that requires a premium model.

A Real Example

One of the most memorable rebuilds we handled came from a large IT operations team running a 24×7 internal service desk. Their n8n setup had grown organically over eighteen months.

New alerts, new integrations, new “temporary” LLM nodes that were never revisited. The flow looked harmless enough on the canvas, but the token bill kept climbing every quarter.

The workflow processed about 9,000 to 11,000 system alerts per day. 

Each alert triggered a six step pipeline:

1. Trigger Node: Monitoring system pushes an alert

2. Classification Node: Label type/severity from raw text

3. Summary Node: Produce a short operator friendly explanation

4. Rewrite Node: Convert internal jargon into “plain English” for management

5. Root Cause Draft Node: Generate a preliminary analysis

6. Routing Node: Decide whether to notify on call or auto close

At first glance, the nodes didn’t seem unusual. But during the review, one detail stood out. Every one of those nodes used the same premium model.

Classification? Premium model.

One paragraph summary? Premium model.

Jargon to plain English rewrite? Also premium.

Even the routing logic, which was essentially a few labels and a boolean, was running through the frontier tier model. The team had picked a “safe” model while rushing to meet an operations deadline months earlier and never revisited the choice.

The logs told the real story:

  • ~320,000 LLM calls/month
  • ~40–45% of total spend coming from the summary + rewrite nodes
  • Average input per root cause draft: ~3,500 tokens
  • Average input for the other nodes: 50–180 tokens
  • Zero differentiation between tasks and everything forwarded to the same heavyweight model

It also had one uniquely bizarre detail…

A node that reformatted alerts into “boardroom friendly language,” because the CTO hated receiving “ugly diagnostics” in his inbox. That single node fired ~30,000 times/month and consumed a premium model on every call.

We rebuilt their flow using a model tier selection loop:

We rebuilt their flow using a model tier selection loop:

  • Classification: moved to a nano model
  • Summaries: shifted to a small model
  • Jargon rewrite: small model (still good enough for the CTO)
  • Root cause analysis: kept on a premium model
  • Routing logic: completely removed from LLM and replaced with rule based checks

The result was immediate:

  • 33,000+ monthly rewrite calls moved to a cheaper model
  • 100,000+ summaries moved to a small model
  • Routing node removed (zero tokens now)
  • Premium model usage isolated to <8% of total calls

Monthly AI cost dropped from $31,800 to ~$4,200, a reduction of a little over 7x, before touching prompts or batching.

The team later added batching to the summary node and brought it below $3,000/month.

The interesting part was the realization that the “serious” LLM work (root cause drafts) had never been the problem. The expensive part was everything trivial that had quietly accumulated around it.

This is why model selection is Lesson 1. It is the lever that determines whether an n8n workflow is economically viable or slowly eating its own budget.

Lesson 2 – Build a Central Model Routing Layer Instead of Hardwiring APIs Into Every n8n Node

When we started rebuilding large n8n systems, very often, workflows were wired directly to individual LLM API keys. Each node had its own model, its own credentials, its own spend profile, and its own failure behavior.

At a small scale this feels manageable. At high volume, it becomes impossible to reason about.

A centralized routing layer changes the economics immediately.

A routing layer is a single endpoint, your “LLM switchboard”, that every AI node calls. It abstracts the provider, the model, the cost controls, and the audit trail. Instead of embedding a specific model into a node, the node points to the routing layer, and the routing layer decides which model actually runs.

The outcome is straightforward, model choice becomes flexible, experimentation becomes safe, and token visibility becomes precise.

We discovered this the hard way while rebuilding a multi department workflow where engineering, support, and operations had each chosen their own preferred model months earlier. The organization ran six different LLM providers without realizing it. Some nodes were hitting old API versions; others were using premium models long after cheaper equivalents were available.

The routing layer consolidated everything:

  • one set of credentials
  • one spend dashboard
  • one place where model choice could be adjusted
  • one boundary for rate limits
  • one location for experiments
  • one point of governance for sensitive workflows

Once the routing layer was in place, teams could evaluate new models in a controlled way and shift production nodes seamlessly. Model selection transformed from a build time decision to a runtime capability.

How to Implement a Routing Layer

1. Centralize the endpoint
Create a single endpoint that all n8n AI nodes call. This can be:

  • a lightweight proxy server,
  • a serverless function,
  • an LLM aggregator (OpenRouter, LiteLLM, etc.),
  • or an internal gateway.

The behavior matters.

2. Abstract model choice behind a simple config – Instead of pointing nodes directly to gpt-x or claude-y, assign:

  • “classification_low_tier”
  • “summary_standard”
  • “rewrite_light”
  • “reasoning_heavy”

The gateway maps these to real models.

3. Add usage logging – Every request should record:

  • model used
  • input tokens
  • output tokens
  • latency
  • cost unit

This makes cost drift visible.

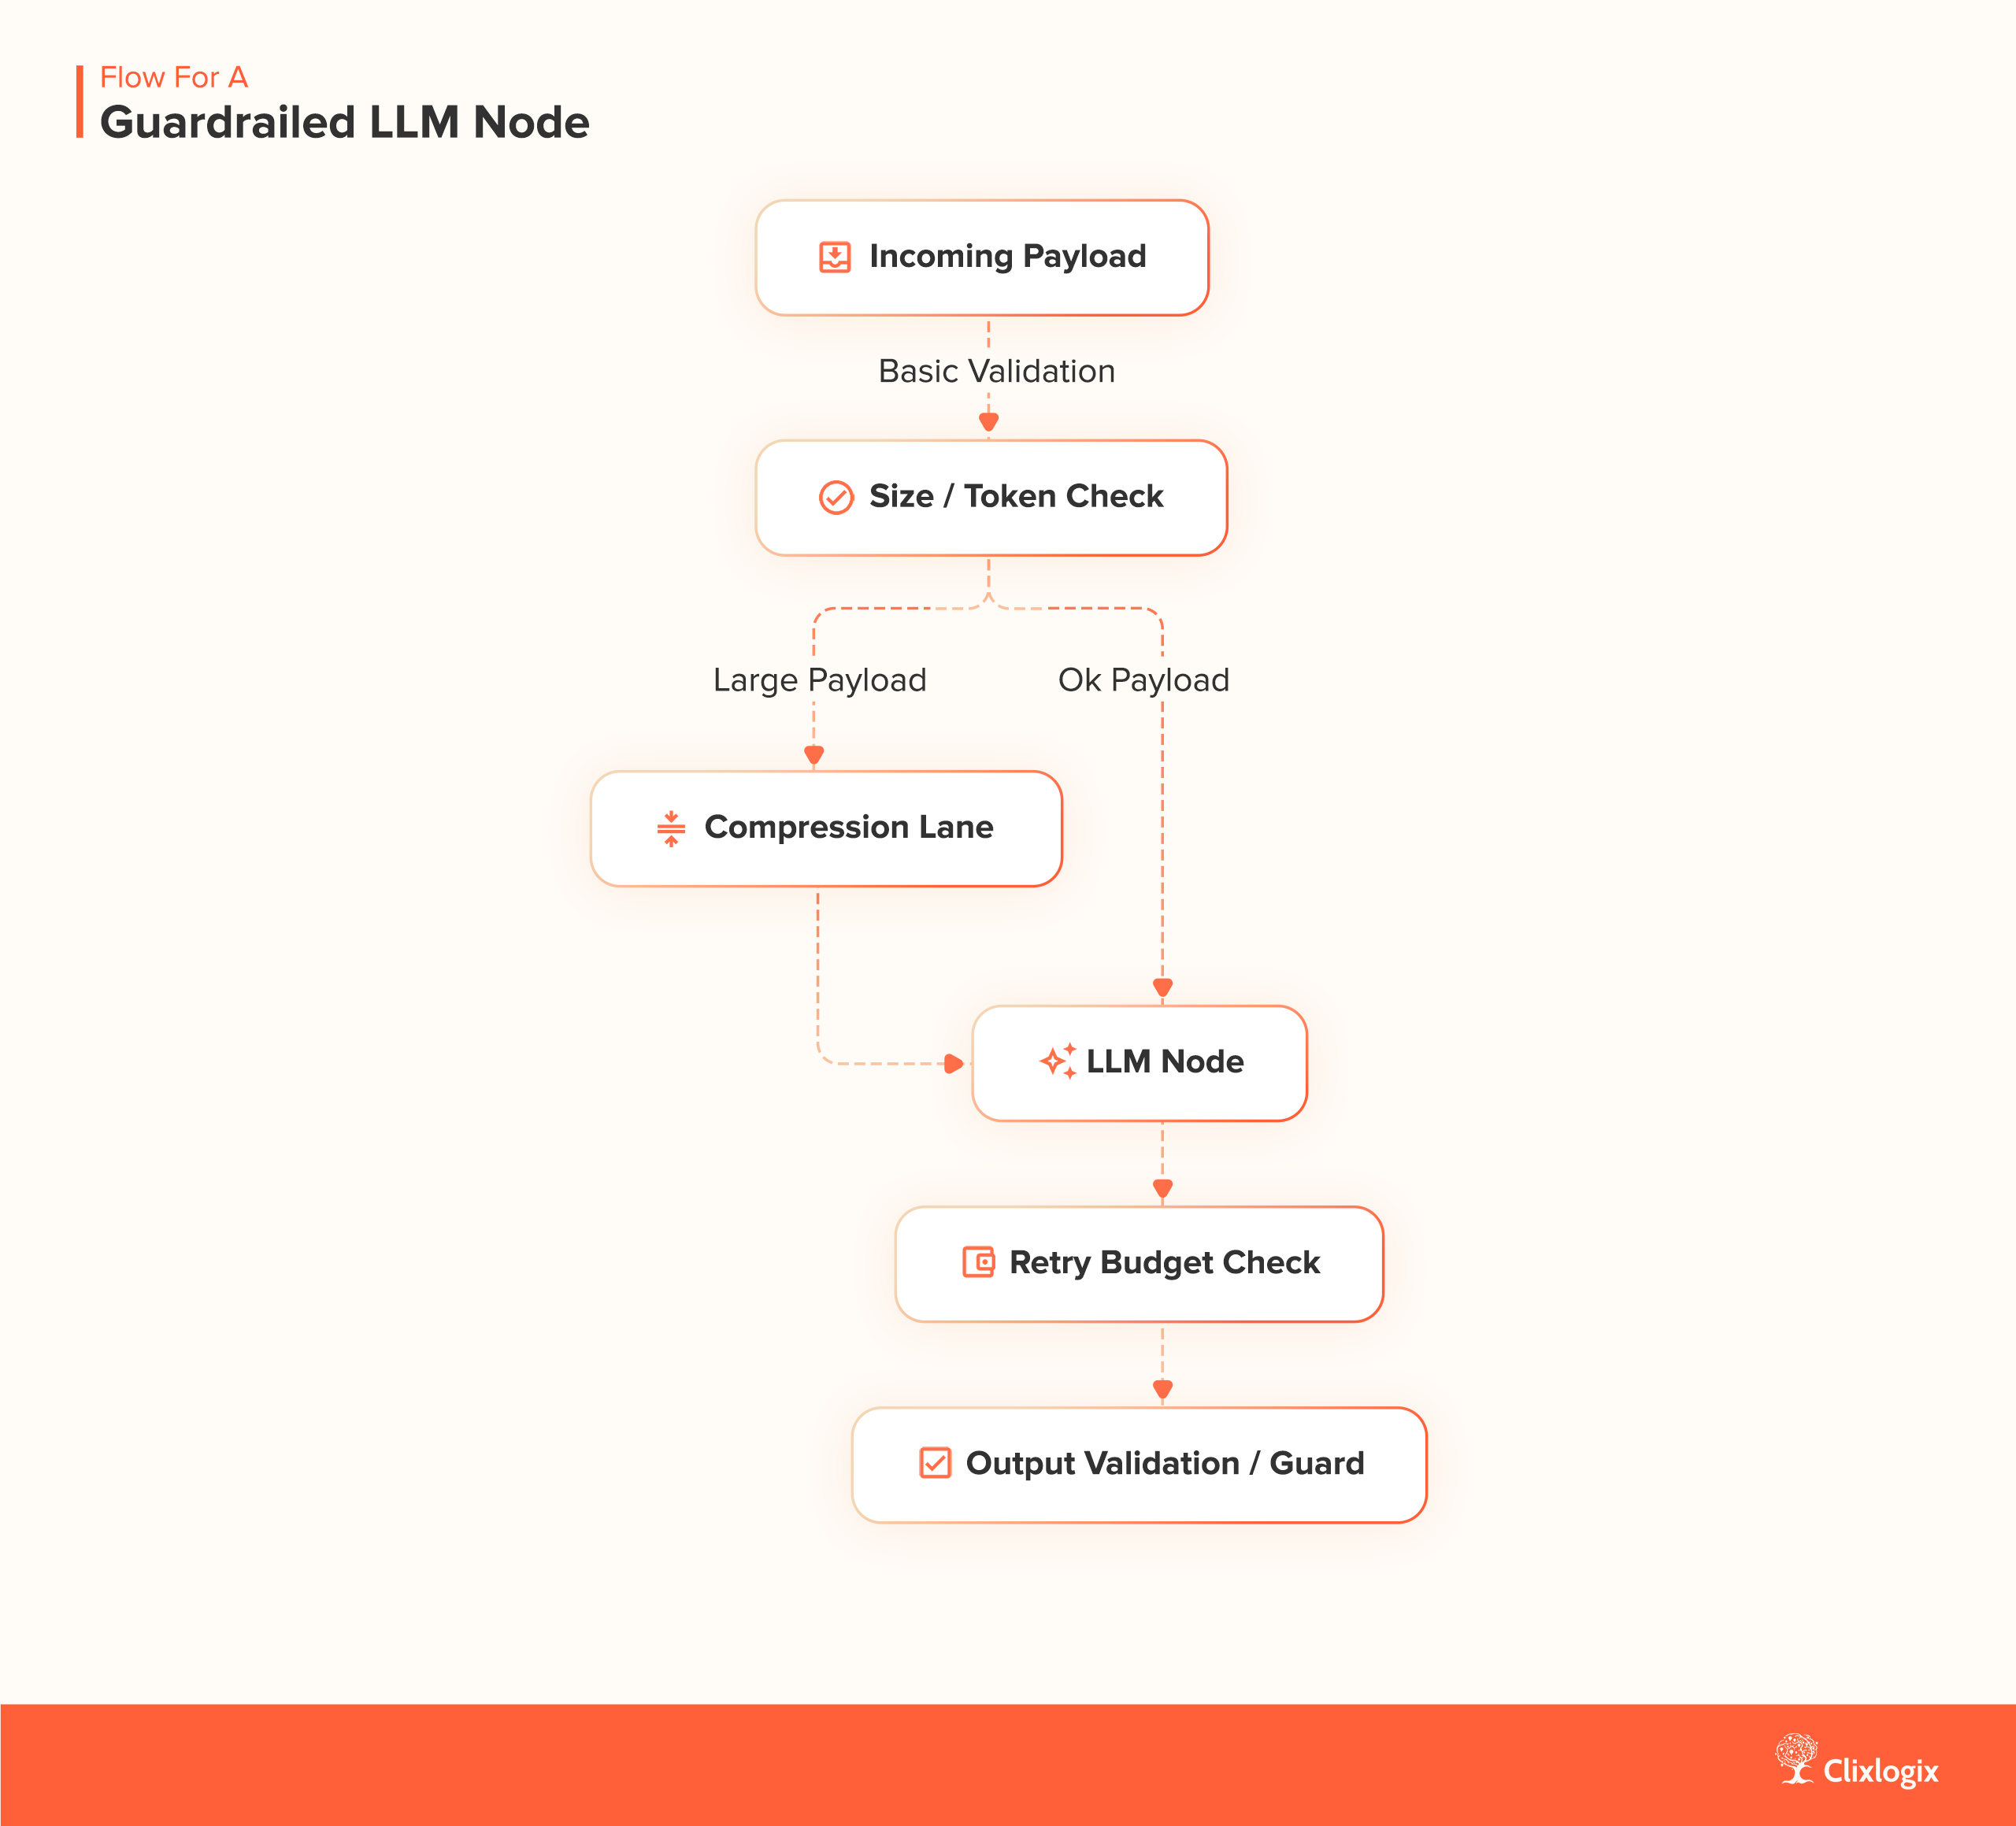
4. Add guardrails – Define thresholds:

  • maximum tokens per call
  • maximum calls per minute
  • maximum spend per day

These protections stop runaway loops before they become invoices.

5. Make model switching trivial – If a cheaper model becomes viable, you change it once in the routing layer, not in 48 n8n nodes.

Governance and the Ultimate Guardrail With Self Hosting

A routing layer is a cost control, but it’s also a governance layer. For workflows handling sensitive, proprietary, or regulated data, the ultimate form of control is abstracting the entire provider.

For mission critical workflows, the strategic choice is to bypass third party APIs entirely and route calls to a self hosted open source model (e.g., using Llama.cpp). This is the only way to guarantee zero data leakage and complete control over the model’s environment. While it introduces operational overhead, it eliminates the data privacy risk, which, in the long run, is a far greater liability than any token cost. The routing layer is the perfect abstraction point to make this strategic switch without rewriting your entire workflow.

The Case of the Vanishing Budget

One rebuild involved a customer communication system that pulled product reviews, summarized them, tagged sentiment, and generated weekly insights for internal teams.

Execution volume: ~250,000 events/month.

Their issue was more of a model choice than the model chaos itself.

Across departments:

  • Support used one model
  • Product used a different one
  • Marketing used a third
  • Old nodes still pointed to defunct endpoints
  • A few calls routed to an obsolete premium model with 4× pricing

Nobody knew where the drift came from because usage was spread across nodes that lived in different n8n projects.

The routing layer created a single source of truth. After consolidating all AI calls behind that layer, it became clear that only 15% of workflows needed mid tier or premium models. Everything else moved to lighter ones. Spend stabilized within a week, and experimentation stopped being a budget risk.

Is Your n8n Workflow Ready for a Routing Layer? Try This Checklist

  • More than 3 AI nodes
  • More than one department touches the workflow
  • You plan to test new models periodically
  • You care about tracking token drift
  • Output quality varies between model versions
  • Model pricing has changed at least once in the last quarter
  • Some tasks run far more frequently than others
  • You plan to build more automations this year

If you check three or more, the routing layer becomes a cost control mechanism, not a nice to have. A routing layer gives you leverage. It makes model selection dynamic, central, and observable. It prevents runaway costs and unlocks systematic experimentation at scale.

And in the long run, workflows with a routing layer don’t just cost less. They evolve faster.

Lesson 3 – Reduce the Surface Area of AI Calls Before You Optimize Anything Else

One of the most reliable cost levers inside n8n doesn’t involve models at all. It begins before a single token is generated.

In every large automation system we’ve rebuilt, a meaningful portion of LLM calls existed only because upstream nodes passed everything forward, irrelevant inputs, noisy data, malformed text, duplicate items, unqualified leads, stale records, or content that never needed LLM processing in the first place.

AI costs accumulate through volume, not intelligence. Volume is controlled upstream. A workflow becomes economically manageable the moment you reduce how many items reach the AI layer.

The Problem We Kept Running Into

Teams often add LLM nodes early in a build. As the workflow grows, additional tasks attach themselves to those nodes, new sources, new triggers, new integrations. Over time, the AI nodes end up processing far more inputs than they were designed for.

This is how we encountered workflows where:

  • 1,200+ records from a CRM sync hit a summarizer
  • 900 low signal support tickets reached a sentiment model
  • thousands of system logs reached a classifier
  • entire product catalogs were sent to rewriting nodes
  • duplicate rows from spreadsheets were passed through analysis
  • inbound messages from multiple territories triggered the same AI check

The lack of upstream filtration was a big issue.

The Workflow That Summarized Everything

One system we inherited belonged to a logistics company processing delivery exceptions. The workflow pulled every entry from a tracking system, missing scans, customer messages, driver notes, delay explanations and all merged into a single n8n execution.

The flow looked like this:

  • Daily Trigger
  • Fetch Exceptions from OMS
  • Split Items
  • LLM Summarizer (premium model)
  • Sentiment + Severity Scoring
  • Routing

On an average weekday, they had 4,000 to 6,000 records. Every record was being sent to the summarizer, no exceptions.

When we opened the logs, the problems were obvious:

  • ~38% of items were low signal operational noise
  • ~22% were duplicates from upstream syncs
  • ~15% were simple status flags (“Left facility”, “Loaded to vehicle”)
  • many had empty customer message fields
  • dozens belonged to internal QA processes that never needed summaries

The LLM was processing all of them. After filtering upstream:

  • only 28% of items required summarization
  • 72% were handled by rule based checks
  • total LLM volume dropped from ~5,200 to ~1,450 items/day

Cost reduction for the summarization path, 3.6x, achieved before touching models or prompts.

Three Forms of Filtering Every Workflow Needs

1. Structural Filtering – Checks that eliminate items with missing or irrelevant data:

  • empty text fields
  • null customer messages
  • internal codes
  • system generated boilerplate
  • duplicates
  • repeated status updates

This requires no AI.

2. Attribute Filtering – Remove items that don’t meet business thresholds:

  • low engagement (e.g., social posts with <X interactions)
  • low severity
  • non actionable categories
  • unchanged metadata
  • out of scope regions or departments

Also no AI needed.

3. Lightweight AI Based Filtering – When relevance can’t be inferred from simple rules, use a cheap model to classify items into:

{

  "should_process": "true/false",

  "reason": "one short sentence"

}

This layer acts as a bouncer. Only items that pass move to the expensive models.

A Practical Filtering Stack for n8n

Here’s the upstream architecture we use repeatedly:

  • Rule Based Filter Node
  • Deduplication Node
  • Attribute Threshold Node
  • Cheap Model Relevance Classifier
  • Batcher (optional)
  • AI Processing Node (expensive model)

In high volume environments, this method becomes the backbone of cost control.

Checklist: Decide Whether an Item Should Hit an LLM

Before sending anything downstream, run it through this list:

  • Does this item contain meaningful text?
  • Is the text unique?
  • Does the item meet the minimum threshold for importance?
  • Can this item be handled with a rule or lookup?
  • Has something about this item changed since last run?
  • Does the workflow gain value by summarizing/classifying it?
  • Will downstream action differ based on the result?

If the answer is “no” more than twice, the item stays upstream.

Filtering is not glamorous and does not appear on model leaderboards. But it is the difference between workflows that scale economically and workflows that silently inflate every month.

Model selection (Lesson 1) determines cost per call.
A routing layer (Lesson 2) determines governance per call.
Filtering determines how many calls happen at all.

This is why filtering forms Lesson 3 as it is the mechanism that prevents your workflow from becoming a token consuming machine long before intelligence is even applied.

Lesson 4 – Collapse Repeated Model Calls Into Fewer, Larger Units

When an n8n workflow processes items one by one, the system prompt repeats for every execution.

If the workflow handles hundreds or thousands of items per run, that repetition multiplies cost without improving quality.

We first encountered this in multi department systems where a single summarizer or classifier sat inside a loop. The node executed perfectly, but the economics degraded with every new data source attached upstream.

Batching changes the cost profile by consolidating items into a single call. The model sees the task once, receives a container of items to process, and returns a structured output. This reduces cost in two ways:

  • the system prompt is paid for once
  • the context window is used efficiently

The effect isn’t subtle. In high volume environments, batching becomes a primary cost lever.

How Batching Fits into Real n8n Workflows

A large portion of n8n automations eg. popular AI short form video generation workflows, involve steps like:

  • summarizing many items
  • generating structured extracts
  • rewriting multiple pieces of content
  • classifying hundreds of rows
  • assigning categories at scale
  • cleaning or normalizing text fields
  • evaluating multiple messages at once

These steps often appear inside a split batch loop or array iterator. Each iteration calls the model independently. The workflow stays readable, but it becomes expensive.

Replacing the iterator with a batch aggregator shifts the economics. Items are merged, the system prompt is applied once, and the model outputs a parallel array with results aligned to the input.

The workflow behaves the same, but the cost profile converges around the batch count instead of the item count.

Batching Recipe for n8n

Step 1: Aggregate Items

Before the LLM node, use:

  • Aggregate
  • Function
  • Merge

to produce a single array:

{

  "items": [ ... original items ... ]

}

Step 2: Redesign the Prompt for Bulk Processing

Instead of:

“Summarize this item.”

Use:

“Process each item in the array. Return an array of results where each index corresponds to the input index. Format: […]”

LLMs handle this well, as long as the mapping is explicit.

Step 3: Respect Context Windows

Each model has a practical upper bound for stable outputs. Instead of assuming the full context window is safe, use an internal guideline:

  • nano/tiny models: ≤ 8–10k tokens
  • small/mid models: ≤ 30–60k tokens
  • frontier models: ≤ 120–180k tokens

These are stability ranges. Beyond these, output quality becomes noisy.

Step 4: Split Batches Dynamically (If Needed)

If an input array exceeds the stability range, use a Function node to chunk it:

const size = 20; // or dynamic based on length

return items.reduce((acc, item, i) => {

  const bucket = Math.floor(i / size);

  acc[bucket] = acc[bucket] || { items: [] };

  acc[bucket].items.push(item.json);

  return acc;

}, []);

n8n then processes each chunk with the same LLM node efficiently.

Step 5: Reassemble Outputs

After the LLM node, recombine outputs into a single collection. This keeps downstream logic unchanged.

Cost Mechanics of Batching

Metric Without Batching With Batching (100 items per batch)
Total Items 1,000 1,000
System Prompt Size 500 tokens 500 tokens
Tokens per Item 200 tokens 200 tokens
Number of LLM Calls 1,000 calls 10 calls
System Prompt Tokens Paid 500 × 1,000 = 500,000 tokens 500 × 10 = 5,000 tokens
Item Processing Tokens 200 × 1,000 = 200,000 tokens 200 × 1,000 = 200,000 tokens
Total Token Spend 700,000 tokens 205,000 tokens
Overhead Reduction — ≈ 50×–200× less system prompt overhead
Latency Impact High (1,000 network calls) Low (10 network calls)

This single structural decision typically produces 50x to 200x reductions in overhead, depending on the number of loops. It also lowers latency because fewer network calls are made.

Checklist: When to Batch

Use batching when:

  • items share the same task
  • results do not depend on cross item logic (unless intentionally)
  • the model can operate on array based prompts
  • your workflow processes more than 50–100 items at once
  • the system prompt is long or complex
  • the workflow uses a premium model downstream
  • memory footprint stays within safe token limits

Do not batch when:

  • each item requires independent reasoning
  • outputs depend on ordering sensitive constraints
  • you need per item error handling at the LLM level

Batching is an architectural habit that changes the shape of your AI spend. The moment a workflow passes the threshold where it handles hundreds of items per execution, batching becomes one of the most cost effective decisions you can make.

Model selection sets the price of a call. Filtering controls how many calls reach the model. Batching determines how efficiently those calls share structure.

Together, these lessons make the cost curve predictable.

A Caution On How Batching Can Become a Liability

Batching is a powerful cost killer, but it has a hard limit, the model’s context window. Pushing too much data into a single call can cause performance degradation, the model loses focus, a phenomenon known as the “needle in the haystack” problem.

Treat the context window as a hard technical guardrail, not a soft limit. For high volume workflows, use these practical cutoffs to maintain quality. Eg.

Nano Models – Do not exceed 10,000 tokens per batch.
Mini Models – Set a conservative limit of 64,000 tokens per batch.

If your prompt is complex, cut these numbers in half. The strategic goal is not to maximize the batch size, but to find the largest batch size that maintains 99% quality. Anything more is a false economy.

Lesson 5 – Reduce Context Before You Reduce Anything Else

The cost of an LLM call increases with every token sent into the model. In large n8n systems, most tokens come from context like system prompts, boilerplate instructions, repeated metadata, formatting rules, examples, and historical context that shouldn’t be there.

The workflow still performs well, but the model is reading far more than it needs. Prompt compression and context minimization solve this by redesigning the shape of the input.

The goal is simple:

“send the smallest, cleanest instruction set that still produces consistent output.”

This becomes more than “prompt engineering” and enters the zone of context economics.

How Context Creeps into Workflows

Inside n8n, context multiplies:

  • the same instruction repeated in every loop
  • long descriptions pasted into every LLM node
  • historical logs included “just in case”
  • examples that no longer match real data
  • verbose system messages copied from another project
  • stringified JSON objects fed into prompts
  • metadata carried forward unintentionally

A workflow that starts with a 300 token prompt evolves into a 2,000 token prompt purely through drift.

Minimizing context begins with recognizing how easily it expands.

Three Techniques that Consistently Reduce Token Load

1. Collapse System Instructions into a Compact Template

Long prompt paragraphs describing tone, style, rules, and fallback behavior can be replaced with a single compressed template.

Example transformation:

Before:

“You are an assistant that extracts structured data…”
“Follow these 12 formatting rules…”
“Do not hallucinate…”
“Maintain a formal tone…”
“If you cannot extract data, output null fields…”

After:

Use the schema. 

No additions. 

No omissions. 

Return JSON only.

Models handle condensed instruction sets well because they work off latent capability, not verbosity.

2. Move Shared Instructions Upstream

When a workflow has many LLM nodes performing related tasks, place the shared instructions in one stable location:

  • a code node
  • a global variable
  • a workflow level parameter
  • a reusable “instruction object”

Each LLM node then references the pre defined template.

This removes hundreds of repeated tokens from every call.

3. Let the Model Rewrite Its Own Prompt

Models respond better to instructions phrased in ways that align with their internal representations. To produce a compact version:

1. Open a test console with your chosen model.

2. Paste your long prompt.

3. Ask the model to rewrite it following constraints:

  • fewer than 60 tokens
  • preserve functional requirements
  • eliminate stylistic explanations 

4. Test the rewritten version inside the n8n node.

The resulting prompt is usually shorter, more reliable, and easier to maintain.

How Context Reduction Changes Token Flow

context reduction token flow impact
how context reduction affects a workflow

Result: ~2.6x reduction in token volume before batching is applied.

Practical Framework – The 4 Box Context Reduction Pass

Before finalizing any LLM node, apply this 4 step pass:

  • Delete – Remove boilerplate and outdated instructions.
  • Compress- Replace verbose rules with compact templates.
  • Extract – Move all shared instructions to a single reference block.
  • Constrain – Add explicit output format rules (JSON, array, schema).

This turns a 900 token prompt into a 150 token prompt more often than not.

Checklist – What Context Should You Remove?

Use this list before shipping any AI node:

  • repeated tone/style instructions
  • redundant warnings (“do not hallucinate…”)
  • long examples when a schema will do
  • metadata carried forward without purpose
  • historical logs or trailing text
  • default fields that never change
  • verbose fallback instructions
  • formatting rules with natural language explanations

Context bloat usually comes from layers of “safety instructions” added across months.

Cleaning it up once saves tokens for the lifetime of the workflow.
Every optimization so far, model selection, routing layers, filtering, batching, reduces external cost. Context minimization reduces internal cost by compressing the instruction layer.

This lesson ensures the system remains lean even when workflows expand, teams add more nodes, or requirements evolve.

Lesson 6 – Put Guardrails in Place So Costs Don’t Drift Over Time

Most n8n workflows don’t get expensive on day one. They show real colors in week four, month three, or right after a teammate adds “one small node” that multiplies usage.

Costs compound when there are no controls, no boundaries on loops, no caps on retries, no checks on payload size, no limits on what flows into the LLM node. Guardrails prevent that creep.

A guardrail in this context is any rule that:

  • caps volume
  • restricts payload size
  • prevents infinite branching
  • stops retries from stacking
  • isolates errors so they don’t cascade
  • halts model calls under bad inputs
  • keeps the workflow inside predictable cost boundaries

When these constraints are in place, AI spending becomes a controllable operational line item instead of a moving target.

The goal is simple

 “A workflow should never be able to spend money by accident.”

Practical Guardrails Every n8n Workflow Needs

1. Hard Limits on Loops and Pagination – Any loop that fetches external data like comments, pages, messages, items, must be capped.

Examples:

  • “Process max 500 items per run”
  • “Stop pagination after 20 pages”
  • “Only fetch the last 7 days of data”
  • “Break loop if input array exceeds 5,000 items”

Loops without ceilings are the fastest way to turn a cheap workflow into a runaway token consumer.

2. Maximum Token Thresholds per Request – Before sending text to the LLM node, measure it. If the input exceeds your threshold, either skip it, break it into chunks, or run it through a summarization step first.

A typical rule:

If payload.token_estimate > 12,000:

    route to a compression node

Else:

    send to main LLM

This prevents giant payloads (logs, multi page emails, scraped pages) from blowing through context windows and budgets.

3. Retry Budgeting – Retries are essential, but unlimited retries turn one failure into 10x cost. A safer method to follow:

  • Max 2 retries
  • Increasing backoff
  • Log failure
  • Move item to a review queue

Retries should never recurse into more retries.

4. Timeouts on External Services – If the workflow fetches data from APIs, Airtable, CRMs, ticketing systems, or internal tools, add explicit timeouts:

  • “Fail after 3 seconds”
  • “Abort after 1 attempt”
  • “Skip if response is empty or malformed”

This stops workflows from hanging, looping, and refetching endlessly.

5. Pre Validation Before Any AI Node – A surprising amount of token burn comes from malformed or empty inputs hitting expensive models. Add a precheck:

  • Is the text empty?
  • Is the JSON broken?
  • Are required fields missing?
  • Is the length too long or too short?
  • Does it match the expected structure?

If not then don’t call the model.  Route it to a cleaning lane or discard safely.

6. Budget Alerts & Quotas – At workflow level:

  • daily quota (“stop after 20,000 tokens today”)
  • monthly ceiling (“halt if >$5 in spend logged”)
  • item level alerting (“warn if > 5k tokens per item”)

These are about predictable operations.

Flow for a Guardrailed LLM Node

n8n guardrails for LLM node
how a call should be protected

This flow ensures no single bad input can trigger excessive cost.

Guardrail Checklist (Use Before Shipping Any Workflow)

  • Loops have explicit maximums
  • Pagination is capped
  • Token size estimation is in place
  • Inputs prevalidated
  • System level fallback route exists
  • Retry logic is capped and logged
  • Downstream nodes never retrigger upstream nodes
  • Expensive calls have a cheaper fallback path
  • Budget alerts (daily/weekly/monthly) configured
  • No hidden branches lead to repeated AI calls

This checklist turns your workflow into something you can operate confidently at scale.

When a “Tiny” Workflow Starts Lifting Heavy Weights

A logistics client had an order classification workflow that ran fine for months, until a vendor changed their API and started returning 5× more records per call. Their n8n loop had no ceiling. The workflow expanded 20 pages deep instead of 4. Every item hit an LLM node. Daily costs jumped from $4 to $58 overnight.

We added:

  • a 10 page cap
  • a 14 day date filter
  • a max token check
  • a fallback “skip on large payload” lane

Costs returned to normal immediately. The client didn’t change their LLM model once.  The guardrails alone solved the problem.

Every lesson before this one focuses on reducing intentional cost, model choice, batching, routing, input filtering. Lesson 6 prevents unintentional cost:

  • loops running longer than expected
  • payloads ballooning over time
  • retries stacking
  • integrations returning more data than before
  • small workflow edits creating new branches
  • new teammates adding nodes without cost awareness

Guardrails keep your workflow inside safe operational boundaries long after the initial optimization is done.

Lesson 7: Cache Everything That Doesn’t Need to Be Re Asked

In every long running automation we’ve rebuilt, 20 to 40% of AI spend came from the same offing, the workflow kept asking a model to solve a problem it had already solved.

Support templates. Product specs. Customer types. Repeating extraction. Formatting instructions. Even the system prompt itself gets rewritten inside each loop.

Workflows don’t remember anything unless you explicitly tell them to. Caching is simply the act of saying: 

“We know this answer already. Don’t pay for it again.”

This single change produces 3x to 15x reductions in daily run workflows by removing redundant intelligence.

Why Caching Matters in n8n (Even If Your Workflow Looks Simple)

Humans assume they’ll remember context. Workflows don’t.

Unless you explicitly store:

  • the result
  • the input that produced it
  • the logic to retrieve it

…the system repeats the same model call next run, next hour, next loop. In n8n, caching is cost optimization.

Two Caching Methods We Use

1. Key Value Caching Through n8n’s Built In Data Stores – A simple framework:

  • use the input (normalized) as the key
  • store the model’s output as the value
  • check the store before hitting the LLM
  • only call the model if the key doesn’t exist

This turns a looping flow from:

1000 items → 1000 model calls

Into:

1000 items → 60 unique model calls → 940 cache hits

If your workflow ingests recurring structures (customer emails, templates, ticket types), this immediately crushes your spending.

2. Session Level Caching (Fast, Temporary, Effective) – This is for high volume, same context runs:

  • fetch chunk
  • classify or summarize
  • store “today’s” result in run level memory
  • reuse it downstream for the next 30–90 seconds

This takes tasks like:

  • “Classify each vendor response”
  • “Tag each order type”
  • “Extract the same field from multiple line items”

…and converts 50–200 calls into 1. You’re conserving intelligence.

Cache at the HTTP/API Layer (The Hidden Cost Saver Nobody Uses)

As mentioned earlier, token waste starts upstream, in the data you fetch before the model ever sees it.

Across rebuilds, we’ve seen cases where:

  • the same CRM record was fetched 8 – 12 times per run
  • product catalogs were reloaded per ticket
  • customer metadata was paginated from scratch
  • static JSON blobs were reprocessed every cron cycle

Every repeated fetch inflates the payload the model must interpret. The fix is mechanical:

  • cache static JSON blobs for 1 day
  • cache customer metadata for 1–12 hours
  • cache taxonomies, configs, prompts permanently

This shifts the workflow from “fetch > parse > LLM > repeat” to “fetch once > reuse everywhere”. And often shaves 10–20% of token load without touching the LLM node.

The Cache That Saved $180 a Month by Accident

A retail operations team had an order enrichment workflow that categorized every incoming order into one of seven buckets. They processed ~6,000 orders daily. The enrichment step used a mid tier model.

The punchline was that only 22 unique order types existed. But the system reclassified all 6,000 every day. We added a simple key value lookup:

  • key = normalized product description
  • value = classification result

Next run:
5,978 cache hits.
22 total model calls.

Monthly AI spend went from $192  to $11.40.

How to Implement Caching in n8n

Step 1 – Normalize your incoming text

Remove whitespace, casing, and IDs so stable inputs generate stable cache keys.

Step 2 – Add a Data Store node (“Get”)

Use the normalized string as the key.

Step 3 – Branch:

If the data store returns a value, use it and skip the LLM call.

If the data store is empty for that key, call the LLM and then store the result using the same key.

Step 4 – Add expiry if needed

For dynamic business data (pricing, categories, FAQs).

Step 5 – Log cache hits vs. misses

This helps you tune key construction for maximal reuse.

Caching Do’s and Don’ts

Do

  • cache all deterministic tasks (classification, extraction, tagging)
  • keep keys short and consistent
  • add expiry to data that ages
  • log false misses
  • test with real production data

Don’t

  • cache hallucinated content
  • cache personal data without hashing
  • assume every workflow benefits, apply to loops, not single calls
  • skip key normalization (you’ll get thousands of “unique” keys)
  • treat cache as a replacement for batching

Many n8n builders think optimization is the same as smarter model selection. But caching is different. It removes unnecessary intelligence entirely. And in n8n workflows that run hourly or daily, unnecessary intelligence is often the most expensive part.

Lesson 8 – Shrink Your System Prompts (They’re 60–70% of Your Spend)

If you open your n8n execution logs and scroll through the raw token usage, you’ll notice something uncomfortable – most workflows spend money on the system prompt.

Every run.
Every batch.
Every loop.

The same 300 to 800 tokens are injected again, and again, and again.

If batching saves 50x, shrinking system prompts often saves another 5×–20×, and it’s usually the easiest optimization in the entire stack. Here’s the part most builders miss:

“System prompts become the highest cost line item in long running workflows, even when the user inputs are tiny.”

Once you see it, you can’t unsee it.

The Hidden Arithmetic Behind System Prompts

Take a very normal structure:

  • 300 to 500 token system prompt
  • 20 to 200 token payloads
  • Looping through 200 to 5,000 items a day
  • Mid tier model (nano, mini, V3, etc.)

That means:

System tokens per day = system_prompt_length × executions

                      = 500 × 2000

                      = 1,000,000 tokens

That’s one million tokens spent on the instructions, not the work.

Cutting a system prompt from 500  to 200 tokens creates an instant 60% cost reduction, even if nothing else changes.

A Case Study On System Prompts

A support analytics workflow we worked on used:

  • a 680 token system prompt
  • looping through ~1,200 tickets per hour
  • 24/7 schedule
  • mid tier LLM (Gemini 2.5 Mid)

System prompt cost alone was $7.80/day, about $234/month, before the model even processed a single ticket. We rewrote the system prompt from 680 to 240 tokens by:

  • removing repeated formatting rules
  • converting long prose into bullet logic
  • replacing paragraphs with structured constraints
  • moving edge cases into a “reference” object
  • compressing examples into 1–2 minimal patterns

After rewriting, system prompt spend fell ~64%. Same output quality. No model downgrade necessary. No change to workflow logic. System prompt volume, not payload volume, had been the budget killer.

The AI Native Prompt Allowing Model To Write Its Own Instructions

We spend hours trying to craft the “perfect” system prompt, but we often forget a simple truth: the model understands its own language better than we do. This is a strategic blind spot.

Instead of engineering the prompt yourself, use a technique we call Meta Prompting. Send a simple, high level instruction to a cheap model (e.g., “Rewrite this task description into a highly efficient system prompt for a large language model that specializes in JSON output”).

The resulting prompt, written by an AI for an AI, often processes instructions 20 to 30% more effectively, leading to higher quality output and fewer tokens wasted on clarification. It’s a strategic shortcut to prompt mastery that pits  the model’s native intelligence against your token bill.

How to Shrink a System Prompt Without Losing Accuracy

Here’s the structure we use now for all rebuilds.

1. Replace paragraphs with constraints

Bad:

“You are an assistant that reviews support conversations and identifies the customer’s core issue using empathetic reasoning… etc.”

Better:

Role: categorize support issues.

Rules:

- extract one primary issue

- write in short phrases

- no diagnosis

- no apology statements

Same instructions. One third the tokens.

2. Convert long examples into compressed patterns

Bad:

“Here is an example of how you should identify tone…” (followed by 2,000 tokens of demos)

Better:

Tone classification pattern:

- angry = direct, clipped, capital letters, accusatory keywords

- confused = question heavy, hedging, uncertainty markers

Examples aren’t always necessary. Patterns are cheaper and often clearer.

3. Use JSON anchors instead of full prose

Bad:

“Based on the inputs, please produce a JSON response that contains the root cause, urgency rating…”

Better:

Output JSON:

{ "issue": "", "urgency": "", "confidence": "" }

Models infer the rest.

4. Move static information into an object

Bad:
Long product descriptions repeated every call.

Better:

Reference:

  product_types: [...]

  categories: [...]

  mapping_rules: [...]

This condenses hundreds of tokens.

5. Collapse formatting instructions

Bad:
Multiple paragraphs telling the model how to structure output.

Better:

Formatting:

- plain text

- no bullets

- single paragraph summary

Short. Deterministic. Cheap.

Here is a  diagram showing how a large system prompt gets compressed.

prompt compression method for n8n

Prompt Compression Checklist (Use Before Shipping)

  • Remove repetition
  • Compress instructions into constraints
  • Replace long examples with patterns
  • Collapse formatting rules
  • Store static data in a reference block
  • Validate that the model still performs on “edge” cases
  • Measure token count before/after

When a Prompt Went on a Diet

A client in hospitality ran a nightly “guest feedback summarizer” across 9,000 survey responses. Their system prompt was 520 tokens. The guest messages were often 25  to 50 tokens.

LLM spent 10x more on instructions than on the data.

We rewrote the system prompt to 140 tokens. Accuracy didn’t move. Cost per run fell 5.4x. Weekly spend dropped from $61 to $11. The client assumed we upgraded the model. We hadn’t touched it. System prompt discipline alone did the work.

Large workflows become expensive because they repeat large instructions thousands of times. This lesson solves that exact problem.

Lesson 9 – Set Token Budgets So Workflows Can’t Spend More Than You Expect

Most teams review their AI spend at the end of the month. By then, the money is already gone, and the workflow has already iterated through thousands of LLM calls. In automation, delayed visibility is the same as no visibility.

A more reliable approach is to treat token usage the way growth teams treat ad spend and the way SRE teams treat compute quotas,  put ceilings on usage before the workflow runs, not after.

Budgets turn “AI cost” from an abstraction into an operating constraint you can plan around.

As one client put it during a rebuild session:

“I don’t want to be surprised. I want the workflow to spend exactly what I tell it to spend.”

That mindset is the entire lesson in one line – you decide how much a workflow can spend, not how much it ends up spending.

Why Budgets Matter in Automation

Without a budget, costs scale with:

  • input volume
  • loop count
  • data shape
  • retries
  • time of day
  • external API changes
  • schema drift
  • sudden traffic spikes

With a budget, costs scale with the number you choose

That single property makes workflow spend boring and predictable, which is exactly what you want in production.

Add Observability – Logging Token Usage (So Budgets Aren’t Blind)

A budget only works if you can see what the workflow is doing while it’s running. Otherwise, every triggered ceiling feels like an error rather than a controlled event.

Token logging is the simplest way to add clarity. It gives the workflow a speedometer.

When you log every LLM call, model, input tokens, output tokens, total tokens, timestamp, workflow ID, three things happen:

1. You know where the workflow leaks

Sometimes a small classification node consumes more tokens than the main summarizer. Sometimes retry loops multiply cost silently. Sometimes an upstream API starts returning bigger payloads.

Logs surface these behaviors immediately.

2. You can predict budget triggers ahead of time

Teams with token logs know on Run #3 that Run #17 will cross the cap. It turns surprise spend into an early signal.

3. You can tune your limits with precision

No more arbitrary ceilings. You set them based on real world runs, not guesses.

Where to Add Logs in n8n

A practical 3 step implementation:

1. Post LLM Code Node to extract usage metadata

2. Log Store (n8n Data Store, Supabase, Dynamo, or even Google Sheets)

3. Run Level Aggregator to sum tokens per run

This gives you token telemetry without needing a full observability platform. Observability is the foundation. Budgets are the enforcement layer. Once both exist, AI spend becomes manageable instead of mysterious.

Three Budget Layers Every n8n AI Workflow Should Have

1. Per Run Token Ceiling (Caps runaway inputs)

This is the most important guard.

Example:

If estimated_tokens > 50,000:

    Stop → Log → Alert → Skip LLM

This prevents:

  • a database record containing a huge blob
  • a customer attaching a 5,000 word email
  • a scraped page unexpectedly expanding
  • a partner API returning an unusually large payload

One cap saves you from dozens of failure modes.

2. Per Day Budget (Stops cost drift)

Good for workflows triggered frequently (hourly or continuously).

Example:

If today_spend > $3:

    Pause workflow

    Send alert

It forces daily predictability, even when input volume fluctuates.

3. Per Item Budget (Keeps complexity proportional)

Especially useful when the workflow:

  • loops over rows
  • loops over messages
  • loops over events
  • loops over comments

Before each LLM call:

If tokens_for_this_item > 3,000:

    skip / compress / downgrade model

This ensures one anomalous item doesn’t blow up the entire run.

Where to Add Budgets Inside n8n

A clean way to do it is:

1. Add a Token Estimator (custom code or pre check node)

2. Add a Conditional Branch:

  • if within limits then proceed
  • if over limit then downgrade model or skip

3. Add a Workflow level Tracker (Data Store or external log)

4. Add a Daily Reset workflow

5. Add an Alert node to email/Slack when limits hit

This turns AI usage into an operational loop, not a guessing game.

Budget Example

Imagine a lead enrichment workflow:

  • processes ~4,000 leads/day
  • uses a mid tier LLM
  • each lead varies wildly in complexity

Budgets applied:

Budget Type Limit Behavior
Per item 2,500 tokens compress long bios before LLM
Per run 40,000 tokens stop run + alert on anomalies
Per day $2.00 pause workflow + notify team

After adding these limits, the workflow’s monthly spend dropped from $118 to ~$34, even though volume increased. Budgets prevent volatility.

“Weekend Traffic Spike” ≠ “Use More Tokens”

A marketplace client saw their Sunday enrichment workflow jump from its usual $3/day to $27 in one run.

Root cause was one vendor pushed a category sync with 47× more product descriptions than usual. No guard. No budget. n8n processed them all.

We added:

  • a per run token ceiling
  • a per item cap
  • a daily spend limit
  • a fallback “cheap model” route

The following Sunday, the vendor’s sync fired again, same volume, same complexity, but this time the workflow behaved exactly the way budgets intended.Cost held steady at $2.90.

Checklist – Before You Ship Any AI Workflow

  • Per item token limit
  • Per run token limit
  • Per day cost ceiling
  • Fallback route if limit is exceeded
  • Logging for all budget decisions
  • Budget displayed in monitoring dashboard
  • Alert when any ceiling hits
  • Workflow pauses in a predictable, recoverable state

Budgets are the difference between “AI cost awareness” and “AI cost control.”

Lesson 10 – Consolidate Your Workflows Instead of Scattering Logic Across 10 Micro Flows

Every team eventually learns this lesson, usually the hard way that workflows get expensive because the architecture drifts. You start with one simple n8n workflow. It works well. Then a second one gets added. Then a third.

Then someone says, “Let’s just clone this for the notification logic,” and before long you have eight or ten small automations stitched together like a patchwork.

Nothing seems wrong at first. Each flow is light. Each flow is legible. Each flow passes review.

But if you zoom out, there’s something deeper going on.

You’re accumulating what we call Workflow Consolidation Debt, the operational equivalent of code duplication, but with a financial line item attached to every execution.

Each small workflow feels tidy on its own, but the architecture becomes expensive as soon as AI nodes are involved.

When logic is fragmented, the system repeats work:

  • repeated system prompts
  • repeated context injection
  • repeated enrichment steps
  • repeated validation
  • repeated round trip API calls
  • repeated retries
  • repeated logging

The problem is the number of times the same instructions are executed across boundaries. Consolidation removes duplication at the structural level. Instead of nine workflows that all run LLM calls independently, you combine the logic into a single workflow that uses branching, routing, and shared prompt blocks.

This structure avoids reloading prompts and rehydrating context every time a new workflow starts.

Why Consolidation Lowers Token Usage

1. Shared Prompt and Context Blocks

When the workflow is unified, the same system prompt and reference information is used once instead of being repeated in every micro flow. This reduces token overhead immediately.

2. Fewer LLM Calls Overall

A single workflow can process multiple steps in one execution. Instead of each micro flow triggering its own LLM call, several steps can run inside the same workflow using routing or task grouping.

3. Fewer Retries and Fewer Execution Starts

Chained workflows multiply failure points. When a downstream flow fails, the upstream workflow often retries as well. Consolidation localizes retries and prevents cost inflation.

4. Lower Logging and Overhead Costs

Each workflow creates its own logs, execution metadata, and input preparation. Combining logic into one workflow removes unnecessary overhead that accumulates over daily or hourly schedules.

How to Consolidate a Fragmented AI Architecture

Step 1: List All AI Nodes Across Your Workflows

Capture every prompt, every transformation, and every place an external model is called.

Step 2: Combine Steps Into One Workflow

Use:

  • If nodes
  • Switch nodes
  • Branches
  • Task grouping
  • Routing decisions using cheaper models
  • Cached values when possible

The goal is to let the workflow make decisions internally instead of handing work off to another workflow.

Step 3: Create a Shared System Prompt

Build one structured system prompt with:

  • Role
  • Rules
  • Constraints
  • Reference
  • Output schema
  • Validation

Use this block in all AI nodes inside the consolidated workflow.

Step 4: Test Consolidation With Real Inputs

Many micro flow architectures hide assumptions. A full consolidation run reveals dependencies and stray logic that need adjustment.

Step 5: Retire Old Workflows After a Transition Window

Keep the old micro flows disabled but accessible for a short period in case of regression.

A Simple Structural Comparison

Before
Multiple workflows, each containing:

  • its own system prompt
  • its own LLM call
  • its own context
  • its own retries
  • its own logging

After
One workflow containing:

  • shared system prompt
  • shared context
  • a small number of LLM calls
  • consolidated branching
  • one retry structure
  • one logging stream

The result is lower operational cost, improved consistency, and simpler maintenance.

When Consolidation May Not Be Appropriate

Consolidate by default, except when workflows require separation for reasons like:

  • different teams owning different steps
  • human approval stages
  • conflicting SLAs
  • separate schedules
  • compliance or audit boundaries

These cases justify separate workflows. Everything else benefits from being unified.

The Practical Outcome

Consolidated workflows reduce the number of executions, reduce repeated token overhead, eliminate redundant LLM calls, and remove avoidable retries. The cost savings accumulate naturally because the architecture stops encouraging duplication.

Consolidation is an operational decision that directly influences token usage, workflow reliability, and long term maintenance effort.

Conclusion

We opened this guide with a founder who fired his vendor after watching token spend climb past payroll. That story was just the one that finally pushed us to rewrite everything from scratch.

After dozens of rescues, audits, rebuilds, and weekend war rooms, the lesson is simple, AI workflows don’t become expensive because teams are careless. They become expensive because the architecture drifts.

The fixes are mechanical:
reduce what flows in
reduce how often you call
reduce what the model must read
reduce what the system must remember
protect every boundary
cache what you’ve already solved
route models with intention
and consolidate the logic so you’re not repeating the same thinking over ten micro flows.

Do these consistently and your workflows stop acting like token machines and start acting like systems.

Whether the team was on n8n Cloud or running their own self hosted instance, the failure modes always looked the same. 

Cloud users felt it first as a billing problem, invoices creeping up month after month with no obvious trigger. 

Self hosted teams felt it through infrastructure instead, CPU spikes, workers saturating, queue delays, models getting slower because every workflow was shoving too much context into the LLM. 

Different environments, same root problem, the architecture didn’t scale with the intelligence being added to it. 

The lessons in this guide come from fixing both worlds, cloud setups that buckled under volume and self hosted systems that burned budget through token churn. 

This guide is about building AI workflows that stay fast, cheap, and stable even as the business grows around them. If you build with these principles, you’ll never get that panicked phone call. And if you do, you’ll know exactly where to look and exactly what to fix.

If You Want Help Diagnosing or Rebuilding Your n8n Flows

We’ve done this across startups, enterprise ops teams, logistics networks, SaaS products, and marketplaces. You don’t have to guess. If you want us to review your flows, hit us up.

We’ll walk you through exactly where the cost leaks are and how to fix them.

Get In Touch Now ->

Written By

Technology Lead

Akhilesh leads architecture on projects where customer communication, CRM logic, and AI-driven insights converge. He specializes in agentic AI workflows and middleware orchestration, bringing “less guesswork, more signal” mindset to each project, ensuring every integration is fast, scalable, and deeply aligned with how modern teams operate.

Don't forget to share this post!

Related Blog

Related Articles

Building an N8N-powered AI Receptionist That Works...

IntroductionMissed calls are a recurring issue for many service businesses. In restaurants, it means lost reservations. In law firms, it means missed clients. In healthcare,...

Integrate Zoho CRM with ChatGPT (OpenAI), Architecture...

A systems driven deep dive for business and technical leaders building AI into Zoho. The Integration Everyone Thinks Is Simple, Until They Try It If...

How Ecommerce Marketing Automation Can Make Your...

Last week, I got a call from a friend in Colorado, who sells semi-precious jewellery online. She walked me through her last holiday season.They had...

15 AI Workflows Real Estate Agents Can...

Across real estate brokerages, two patterns are emerging. Teams that teach AI to handle the repetitive preparation work are opening up more time for tasks...

View All
About
  • Company
  • Our Team
  • How We Work
  • Partner With Clixlogix
  • Security & Compliance
  • Mission Vision & Values
  • Culture and Diversity
  • Success Stories
  • Industries
  • Solutions
  • We’re Hiring
  • Contact
Services
  • Mobile App Development
  • Web Development
  • Low Code Development
  • We Design
  • SEO
  • Online Advertising
  • Social Media Management
  • More
Solutions
  • Automotive & Mobility
  • Information Technology & SaaS
  • Healthcare & Life Sciences
  • Telecommunications
  • Media, Entertainment & Sports
  • Consumer Services
  • And More…
Resources
  • Blog
  • Privacy Policy
  • Terms Of Services
  • Sitemap
  • FAQ
  • Refund Policy
  • Delivery Policy
  • Disclaimer
Follow Us
  • 12,272 Likes
  • 2,831 Followers
  • 4.1 Rated on Google
  • 22,526 Followers
  •   4.1 Rated on Clutch

Copyright © 2025. Made with by ClixLogix.